
Fix 1 – Change Duplex Settings
Step 1. Right-click on the Start menu button and select Device Manager.
Step 2. In Device Manager, look for the Ethernet Adapter. You will find it under Network adapters (Click on network adaptors to expand).
Right-click on the Ethernet adapter you are using and select Properties.
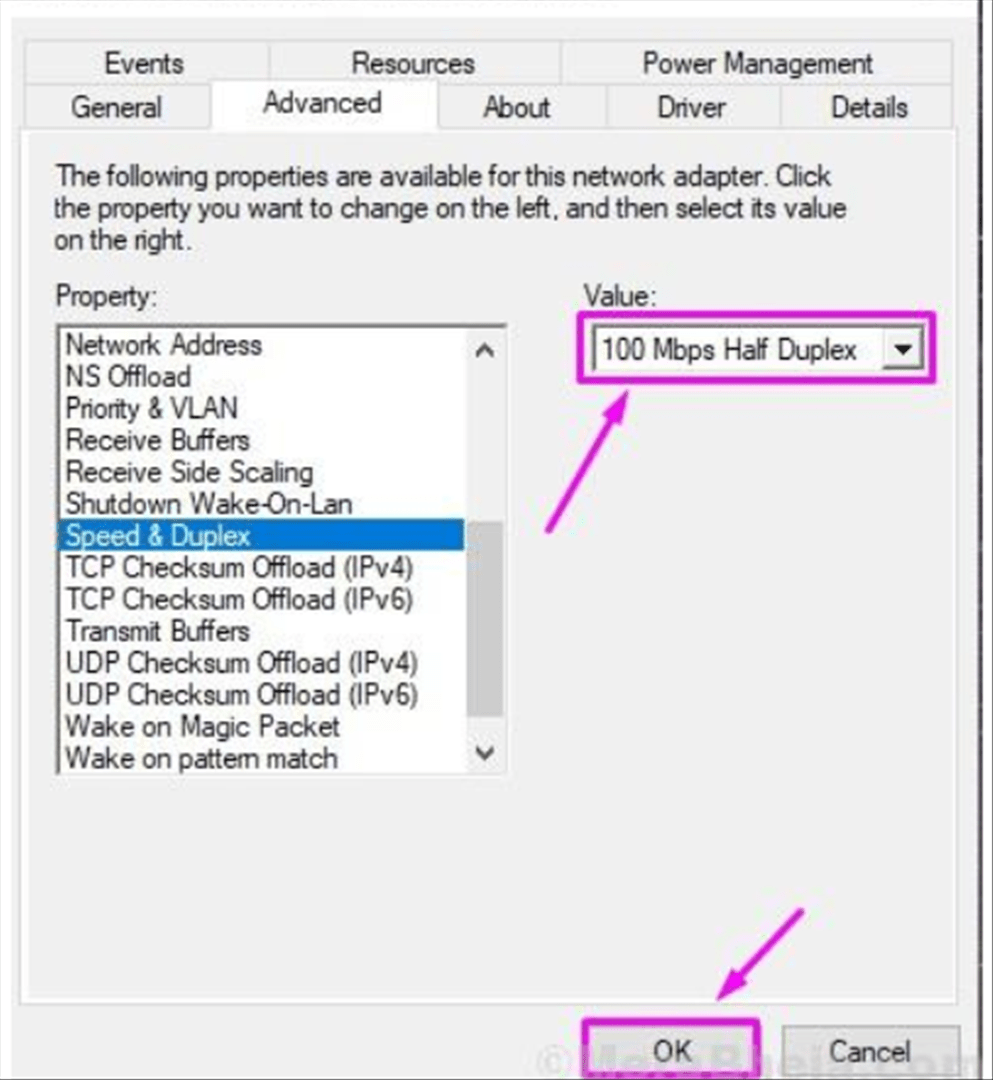
Step 3. Go to Advanced tab and locate Speed & Duplex under Property. Click on it to select it.
Step 4. Now, change its value to 100 Mbps Half Duplex. Click on OK.
Step 5. Restart your computer.
Note: If this does not help. Just Change the value to 10 Mbps Full Duplex and Check again and see if it works.
Fix 2 – Disable Ethernet Connection and Perform a Hard Reboot
Step 1. Look for Wi-Fi icon or the network adapter icon on the taskbar. Right-click on it and select Open Network & Internet Settings.
Step 2. Under Related Settings, go to Change adapter options.
Step 3. Now, locate your Ethernet connection and right-click on it. Click on Disable.
Step 4. Turn off your computer and remove the power cable from it. If you are using a laptop, remove its battery too. Also, unplug the Ethernet cable.
Step 5. Wait for good 15 minutes.
Step 6. Connect the cable and battery to your computer, and turn it on. Don’t connect the Ethernet cable yet.
Step 7. Right-click on Wi-Fi or network adapter icon and select Open Network and Internet Settings.
Step 8. Go to Change adapter options under Related settings.
Step 9. Right-click on your Ethernet connection and select Enable.
Step 10. Connect the Ethernet cable back in its slot.
Check if this method has solved your problem, or not. If the issue still persists, try the next method.
Fix 3 – Uninstall Ethernet Adapter Drivers
Step 1. Right-click on the Start menu button and select Device Manager.
Step 2. Expand Network Adapters and right-click on your Ethernet Adapter. Select Uninstall device.
Step 3. When asked for confirmation, mark the box beside Delete the driver software for this device and click on Uninstall.
Step 4. Now, click on Scan for hardware changes.
After performing the last step, Windows will install the default drivers for Ethernet Adapter. Check if this has solved your problem. If you are still facing the issue, follow the next method.
Fix 4 – Update Ethernet Adapter Drivers
Step 1. Right-click on the Start menu button and select Device Manager.
Step 2. Expand Network Adapters and right-click on your Ethernet Adapter. Select Update Driver.
Step 3. Click on Search automatically for updated driver software.
Fix 5 – Check Hardware for Issues
Before beginning with troubleshooting methods on your computer, you need to make sure that everything’s fine with the hardware. Check the Ethernet cable, on both ends and make surer it isn’t broken. The Ethernet cable must be properly plugged in the correct slot at the router. Also, if it is possible, try connecting the Ethernet cable on another computer. Check if the internet works on it, or not. If everything’s working fine on the other computer, then the issue is originating from inside of your computer, which we will try to fix in the methods mentioned below.

- How to request Google to re-crawl my website? - September 23, 2020
- How do I transfer photos from iPhone to Windows 10? - September 12, 2020
- How to Disable IPv6 in Windows Server 2012 - September 10, 2020