
FOOLING ITUNES WITH SYMBOLIC LINKS
Step 1: Create a folder for your new backup location. While this step shows a folder labeled New iTunes Backup created within the root of partition D, you can practically create it at any location you want.
However, do remember to modify the file path as appropriate when creating the symbolic link later.
Step 2: Press Windows-R to open the Run box.
If you are using the desktop version of iTunes, type the following into the search box:
%APPDATA%\Apple Computer\MobileSync
If you are using the Windows Store version of iTunes, type the following instead, but make sure to replace C with the correct drive letter of your primary Windows 10 partition, and [USERNAME] with your Windows username:
C:\Users\[USERNAME]\Apple\MobileSync
Once you’re done, click OK.
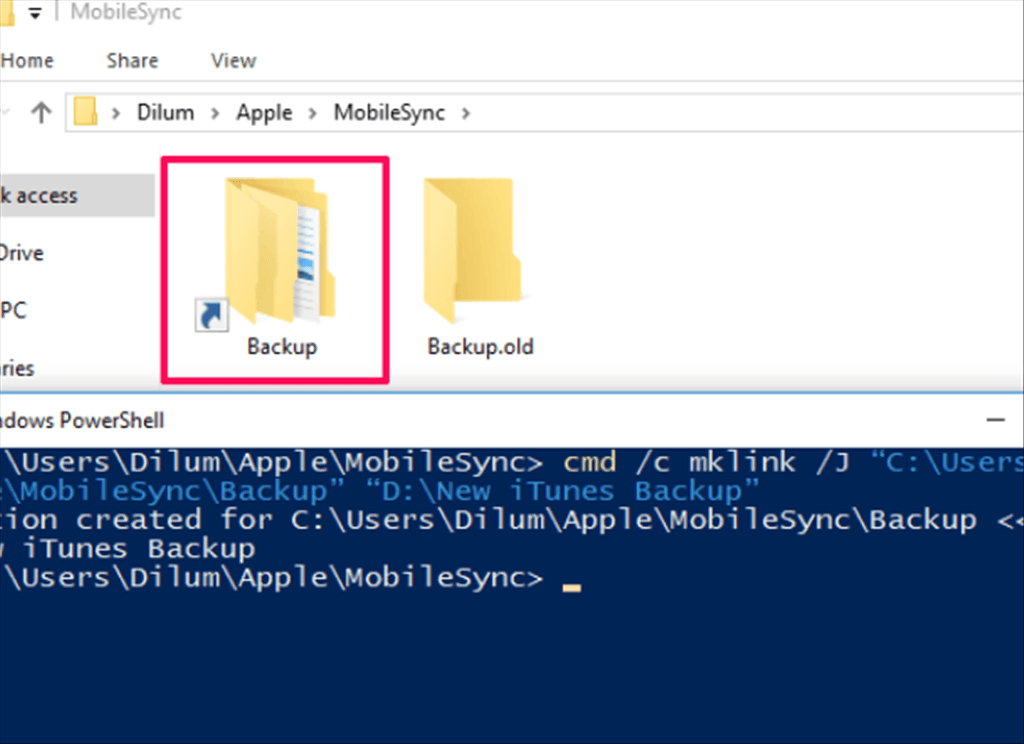
Step 3: A File Explorer window should now open the iTunes MobileSync directory automatically, and you should see a folder labeled Backup listed within — this is the default location that contains your backup folder and other archived backups.
But before proceeding with the symbolic link, you need to rename this folder to avoid any conflicts. To do that, press F2 — or FN-F2 — and name it to Backup.old. You’ll get back to this folder later to copy the existing backups to the new location, so don’t worry.
Step 4: Hold down the Shift key, and then right-click a vacant area within File Explorer. On the context menu that shows up, select Open PowerShell Window Here. Windows 10 should now launch PowerShell.
Step 5: Depending on your version of iTunes, enter the following command line into the PowerShell window. Note that it has the new backup location included at the end of the line, so do make the necessary adjustments to the file path if yours differ.
If you are using the desktop version of iTunes, type:
cmd /c mklink /J “%APPDATA%\Apple Computer\MobileSync\Backup” “D:\New iTunes Backup”
If you are using the Windows Store version of iTunes, type:
cmd /c mklink /J “C:\Users\[USERNAME]\Apple\MobileSync\Backup” “D:\New iTunes Backup”
Once again, make sure to replace C with the drive letter of your primary partition, and [USERNAME] with your Windows username.
Step 6: Press Enter to execute the command. If you did everything properly, a new folder named Backup should show up within the MobileSync folder.
The folder looks like a shortcut, but unlike a normal shortcut, you can access it just as you would a normal folder.
However, anything that you paste into this folder should also show up in your new iTunes backup location, and that’s what we’re going to do next.NOTE: You can now exit the PowerShell window.
Step 7: Head into the Backup.old folder, and cut and paste the contents within it to the automatically generated Backup folder.
Step 8: You’ve got your old backups in place, and now it’s time to create a new one from scratch to find out if iTunes handles things properly.
Simply connect your iPhone or iPad to your PC, launch iTunes, and get to the Summary tab of your device. Now, select the radio button labeled This Computer, and then click Backup Up Now.
After the procedure finishes, visit your new backup location and you should see your main backup folder updated — check the timestamp.
When looking to restore your iPhone or iPad, iTunes detects your backup, including any archived backups, with no issues.
REMOVING THE SYMBOLIC LINK
Depending on your version of iTunes, get to the MobileSync directory and launch PowerShell with the Shift key pressed. Once inside, run the following command:
cmd /c rmdir D:\New iTunes Backups
Change the file path at the end of the command line as required to point to your new iTunes backup location.
Press Enter to remove the symbolic link. Afterward, manually create a new folder within the MobileSync directory, name it to Backup, and then copy back your older backups from the previous backup location. Things should be back to the way as they were supposed to from now on.
- Fix “Sorry, This File Type Is Not Permitted for Security Reasons” Error in WordPress - August 25, 2020
- My HP OMEN is showing a “plugged in, not charging” when I plug it in to charge. - August 25, 2020
- Access another computer with Chrome Remote Desktop - August 22, 2020